Home Renos – Bathroom / Kitchen

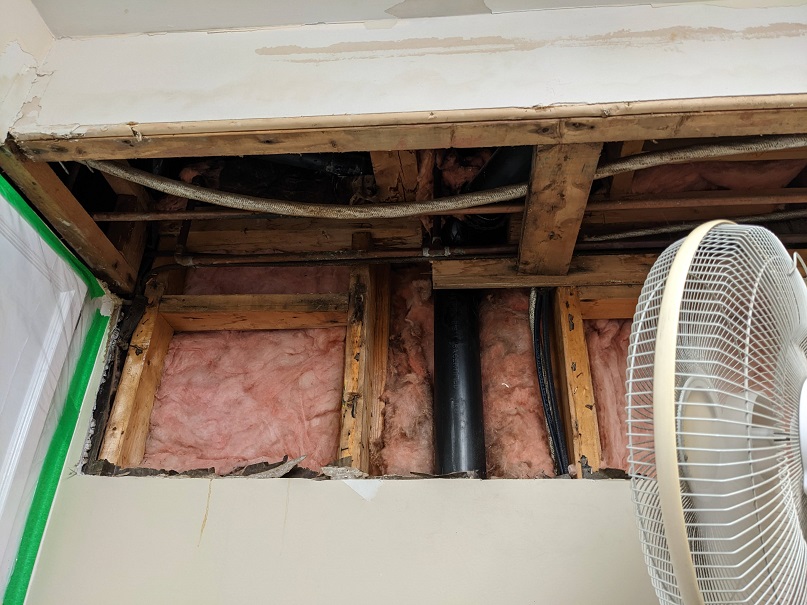
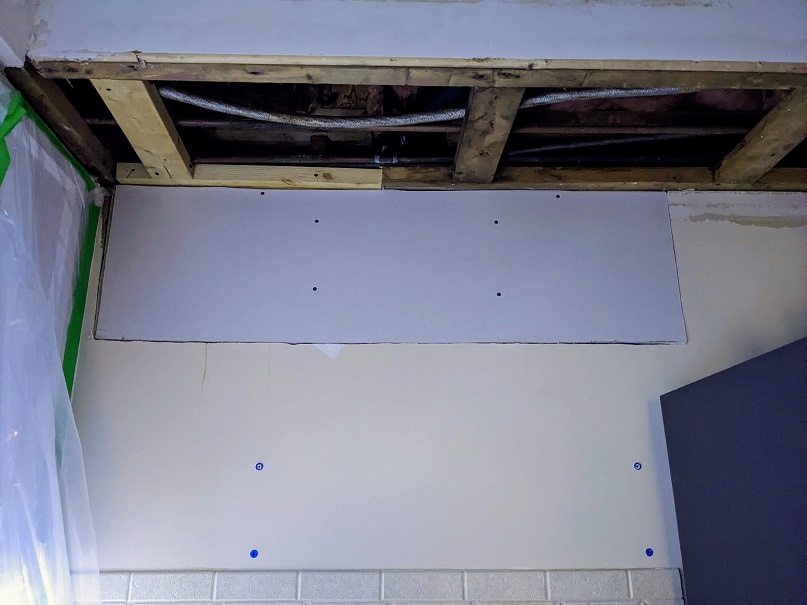
For the last three months, we have been in home reno mode. We were already talking about doing something in some areas of the house (the dining room space, specifically) when we had an issue with the bidet attachment on our upstairs toilet leaking and cracking a few of the floor tiles from the water damage. There is no way of telling how long it was leaking based on the damage we saw after opening up the bulkhead, but we did see it wasn’t the first leak that toilet had, and ours was just the latest. The new wood planks in the pictures are replacements for any of the moldy, rotted out old planks that suffered from past toilet leaks.

How we discovered this problem was one day there was a gross rust colour water on my kitchen counter that I couldn’t trace at counter height after moving all kinds of stuff out of the way, so I started to look around, and then up. EEK.

I turned on all the kitchen lights, and that’s when I saw a huge wall bubble of water behind the paint where the ceiling/bulkhead/wall meet. The paint I just put on those walls four months earlier. Ugh. I pointed it out to the husband, and he started poking around. While at work the next day, the husband used his staycation time to literally poke the bubble to empty it. All over my barely covered counter and cooking tools/spice racks. *sigh*

But that’s not the only thing he poked open. I came home to this above pic visual. So after a quick text consultation with my contractor brother, we set up a big fan and let it air dry for a few days while we assessed the damages and bought materials to replace and fix up the ceiling, wall, wood, drywall, and paint. Luckily the husband was able to do all of this while I worked that week, so I wasn’t in his way and he had loads of time to get it done properly without feeling like he needed to rush this job. That was the last thing I wanted, but at the same time, being without a full functioning kitchen for almost 1.5 weeks was a bit tiresome. I was glad to have my cooking space back, let me tell you.

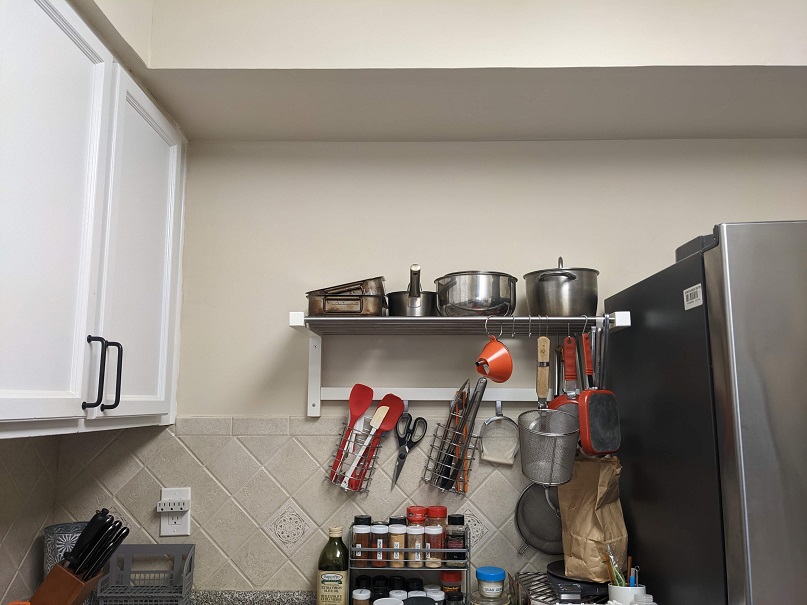
And I couldn’t be happier with the work my husband did in there. I honestly have to look hard to see where this all went down on that wall and along the bulkhead. We stopped the leak for now, but eventually we will need to rip up our bathroom tiles. Issue there is those tiles match the ones on the shower walls, so… It will be a job, for sure.

There are touch-ups that need to be done in the kitchen, but now he’s eyeballing the light fixture as something he wants to replace with pot lights, and well, that just means more painting in the future, so we’ll leave the corners and edges for then.

But in the meantime, I was getting continually frustrated with lack of storage space in my kitchen and dining room to fully store all of my ‘kitchen shit.’ So, the husband finally cracked and created something for me in the IKEA building planner, and after I signed off on it, he went shopping. That’s a post for another day very soon. And I took pix. 🙂

And we did a few other projects that I will post about when I have some time this week.

Air Fryer Ciabatta Bread Loaves

A few nights ago I found a Youtube video showing me how to make ciabatta bread from scratch that can be baked in an air fryer. So, D-UH, I was into it. Here is my first attempt. This picture shows the bottoms after I finished flipping and baking the loaves. The tops look just as beautiful.

I made the mistake of spraying the loaves instead of brushing them with melted butter. I won’t do that again. I didn’t like the finished tops as much, but I did like them. Another thing this recipe calls for is using a bigger than the basket size of parchment so you can pinch up a segregation wall in the middle so the loaves don’t proof and bake together as one square of bread.

Baked at 400* for 8 mins over parchment paper, and then the parchment came off to finish the flipped over loaves in the bare pan another 6-7 mins. When they came out they felt hard or perhaps a tad overbaked, but after a quick rest on a rack, they soften up nicely. I was pleasantly surprised. 🙂

Air Fryer Mac & Cheese

Made this one last night. It took way too long and too much futzing with it to get the elbow noodles to finally finish cooking before adding the toppings and finishing it. BUT, I have ideas on how to speed it up for the next time.

After 25 mins, the cheese sauce was like molten lava. But that was ok; I felt it would help the toppings bake up faster, and I was right. Look at those bubbles along the rim of the baking dish in the video below. Love that visual.

Air Fryer Mac & Cheese:
1 1/2 C: Elbow Pasta / Water
1 tub Black Diamond White Cheddar Sauce (my new fave product!)
2+ tbsp Dry Mustard
1 tea: Onion Powder / Paprika
S&P

Stir it all up and put the baking dish inside the basket. Cook it at 360* for about 20 mins, stirring often to pull the protein skin down into the sauce every 4-5 mins. Till and turn the noodles up from the bottom so it all gets an even cook overall each time.

When you hit the 20+ mark, taste the noodles to see where their doneness is. If you need more liquid to get them softer, add 1/4 cup of water or heavy cream. Continue cooking it another 5 mins. Before adding the toppings, make sure the pasta is el dente. And then, add:

1+ C Marble Cheddar, grated
1/4 C Italian Seasoned Breadcrumbs

Bake the dish with the toppings about 4 more mins. The dish was super hot, so I pulled the drawer out and scooped the mac out with a serving spoon directly. I didn’t even bother trying to get that hot dish out of the basket. It wasn’t necessary to do so.

I will post an update to the time saving changes after I make this again next week.

Air Fryer Grilled Cheese

Made this one a few weeks ago, but I keep going back to it when I’m feeling lazy. This, and that great cheese toasts. Both are the ultimate lazy girl solo dinner.

Anyway, the trick to getting a good toast colour is buttering the bread on both sides of the bread. Sometimes I use mayo since it has a fat component in it already. Either will colour the bread nicely.

I typically cook this at 400* over a small sheet of tin foil for about 6-8 mins for a crispy exterior.

French Onion Soup Mac & Cheese

I saw this video from Sam The Cooking Guy making his version of this same dish, and thought, I can make that faster using canned soup. This was a lovely tasting change up on the classic pasta dish. One I liked enough to want to make again in the future.

French Onion Soup Mac & Cheese:
2 C Small Pasta
Salt

1 1/2 – 2 C Cheddar Cheese, grated
1/2 C Panko Breadcrumbs
1 1/2 tbsp Dry Rub (of choice)

1 can Onion Soup, hot
1/3 C Pasta Water, reserved

Scoop the cooked pasta into a large bowl to mix with everything else, including some reserved starchy water from the pasta pot. Top with some green herbs or green onion chops, as well as some cracks of pepper.

Quick Butter Chicken

This isn’t my recipe, it’s Arron & Claire’s, and it’s a keeper. It’s quick, it’s easy, and it’s tasty. In short, this recipe gets the job done on nights where I am craving Butter Chicken and don’t have a jar sauce on hand in my pantry. Luckily, I stock all of the ingredients to make it when push comes to shove. 🙂

Quick Butter Chicken:
4 Chicken Thighs, bite size cubes
1/3 C Plain Yogurt
1 tbsp Garlic, minced (or 1/2 tea Garlic Powder)
1/2 tbsp: Garam Masala/Cumin/Ground Ginger/Chili Powder
S&P

Oil
1/2 C Yellow Onion, diced
30 g Cashews, rough chopped (opt)
3 C Passata Sauce

5 tbsp Butter
1 tbsp: Ginger, grated/Chili Powder/Cumin/Ground Coriander/Garam Masala
1/2 tea: Sugar (or a pinch of carrot, grated)/Salt

2/3 C Water
1 C Heavy Cream (18 – 35%)
5 tbsp Butter
1/4 tea Chicken Stock Powder

Mix the cut up meat in the yogurt mixture and rest it for 20 mins as you prep everything else. When ready, get your skillet heated up. After 3 mins, add some neutral oil and drop the meat in carefully in small batches. Brown the chicken to take advantage of the maillard reaction. All of that browning = flavour. (The meat will finish cooking as it rests in the hot sauce later.) Rest rest each browned batch in a bowl with paper towels set inside as you work.

In a bigger skillet, or a big pot, heat up some different oil and dump in the diced onion to soften. Add the cashews. Sautee for a minute before adding the passata sauce. Stew that together for 5 mins before adding the meat in. Stew the sauce another 5-8 mins to cook the meat through.

At the end, add the water, butter, heavy cream and chicken stock. When you’ve stirred it all together, plate some of the meat in shallow bowls off to one side, top it with a ladle of sauce, and drop the starch of choice (cooked rice, mash potatoes or naan bread chunks) over the sauce. Serve with a dollop of sour cream if desired, topped with some chopped cilantro leaves.