Dilled Mushroom Stroganoff

PickleJuice PickleJuice2

This is a recipe I’m working on currently. I love it as is because it’s so quick, easy and flavourful without a lot of ingredients needed, but I still want to tweak it to see if I can make it better in the future to suit my moods. But, for now, this is the basic idea. Try it at home and let me know what you think.

The twist to this classic is that instead of wine (we don’t drink it here), I use dill pickle juice.

I know, right?!

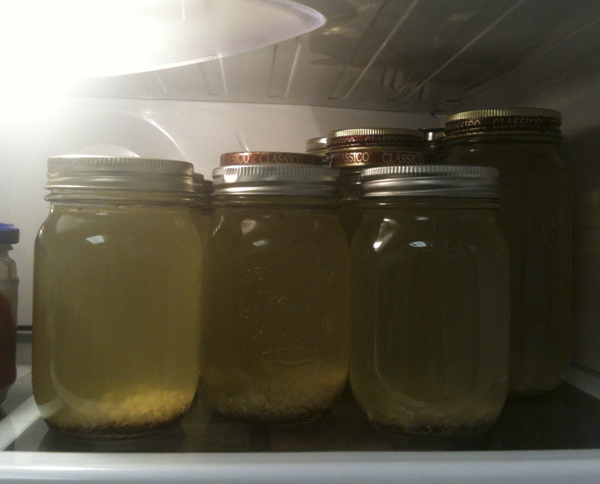
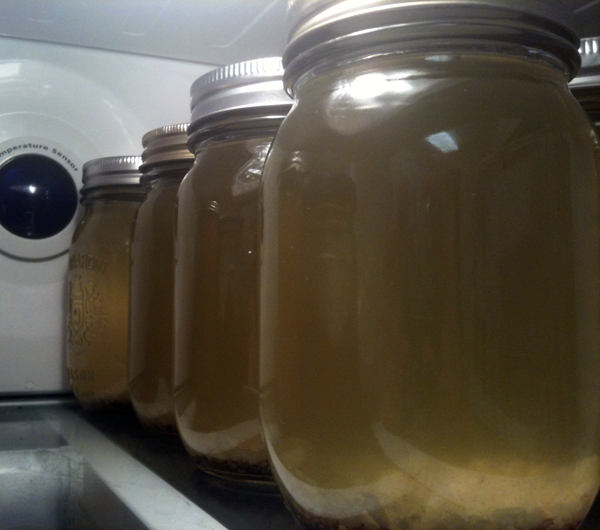
At work I’m fortunate enough to have access to pails upon pails of pickles where the brine is left behind after we slice up the pickles for garnishing. I took a half pail home one night and as you can see in the above pic, it filled up a lot of my mason jars quite nicely. I am currently dreaming up uses for all of that delicious dill pickle brine. If you have any ideas, please leave them for me in the comments!!

Auntie Stacey’s Dilled Mushroom Stroganoff:
1 C Mushrooms, thinly sliced and washed
1/2 C Red Onions, thinly sliced
1 Tea Bacon Fat
1 Tbsp Oil

1/2 C Pasta

1/2 Tea Paprika
S&P, to taste
1 Tea Basil, dried (or 1 Tbsp fresh, chopped)
3/4 C Dill Pickle Juice

1/2 C Full Fat Sour Cream (or plain cream cheese if you prefer)

Put a pot of water on the stove to boil for the pasta. In the meantime, heat up a large frying pan. Wash and sliced up the mushrooms, and then sliced up the onions. When the frying pan is hot enough, add the bacon fat. Let that melt before adding the oil. When those two are hot enough, place the onions into the pan and let them soften a minute or two before adding the sliced mushroom. Toss them around in the fats to coat before reducing the heat to med-low and cover the pan with a lid to slowly cook the veg down.

Salt the pasta pot and add the noodles. As the noodles cook, add the paprika, basil and S&P seasonings, as well as the pickle brine juice, to the onions and mushrooms. Again, toss to coat all the vegetables completely. Return the lid to the frying pan to cook till the pasta is done. At that point, add the sour cream to the pan. Stir the cream into the brined vegetables fast so it doesn’t scald or burn. Take both the pot and pan off the burners, and turn off the stove burners.

Drain the pasta a large bowl and top with the stroganoff, stirring to incorporate both into one before plating, or simply add the cooked pasta to bowls and top with heaping spoonfuls of the stroganoff. Top each bowl with a bit more basil if using fresh leaves.

Mixed Fruit Brown Betty

This is a cobbler (A.K.A.: crumble, Brown Betty or crisp) I made the other night after work when I was especially burned out and in need of a great comforting dessert that I could put together without having to read or follow a cookbook or an online recipes. Basically, I used the formula I always do for my fruit cobblers, and threw in whatever I felt would work that was kicking around at the time.

I used a bag of frozen mixed berries I bought at the grocery store back when they were on sale for this very type of occasion. It was a mix of strawberries, blueberries, raspberries and blackberries. I cut the bag open at the top and down from sternum to tailpipe, and dropped the frozen lump into my baking pan. While that came up in temperature enough that I could break it up with my wooden spoon, I assembled the rest of the filling in a small bowl, and then assembled the topping ingredients in a slightly bigger bowl. When everything was prepped and the fruit was softened up enough, I took the butter out of the fridge and diced it up into half inch cubes, and separated them into two piles – one for the top, one for the bottom of the cobbler.

Here is what I came up with the other night for ingredients. The overall taste was spot on my target, and the husband was really into it. WIN!

Auntie Stacey’s Mixed Fruit Brown Betty:
1 Bag Frozen Mixed Fruit, enough to fill a 6-8 serving medium size baking dish
1 Pinch Salt
1 Tea Ground Cinnamon
1/4 Tea Ground Cardamom (optional – I happen to always have it on hand)
1/4 C Brown Sugar, lightly packed
4 Tbsp Cornstarch
3 Tbsp Cold Butter, cubed
Juice of half a Lime

Mix this into a small bowl and toss it over the fruit. Use a spatula to mix everything enough. None of the ingredients have to be perfectly incorporated, and there’s no need to work the butter cubes into the filling’s dry ingredients. This is a rustic dessert, not a sophisticated Cherries Jubilee.

1 1/2 C Old Fashioned Oats
1/2 C Flour
3 Tbsp Cold Butter, cubed
1/4 Tea Ground Cinnamon

Using a butter cutting gadget, or two knives, or your fingers, cut up the butter and incorporate as much of the finer dry ingredients for the topping into the butter as you want. Again, it doesn’t have to be perfect or even all smooshed up. It’s a rustic dessert, so leave some clumps untouched and unsmooshed.

Top the filling with this crumbled mixture and bake at 350 degrees for 45 minutes uncovered. Leaving it uncovered will allow the oats in the topping to crisp up nicely as it deepens in colour.

Let it rest at least 20 minutes before you dig in. At least! I let mine rest up to a full hour sometimes. What the rest period does for the dessert is to allow more time for the mixture of cornstarch and brown sugar in the filling to cook down all liquid coming out of the fruit into a love thickened syrup. That syrup, by the way, is great spooned over some ice cream or whipped cream should you serve that alongside this dessert. (And I highly recommend that you do.)

PS: I was so frazzled from work the other night, we ate it all over two days and never once thought about taking a picture for this blog entry. My apologies. You all know what cobblers look like, right? If not, and you don’t or can’t wait till I make this again to photograph, you can always use Google images to see what these desserts looks like.

Enjoy!

Korean Beef & Noodles

Korean_Beef_Udon_Noodles_001

[ Placeholder picture from “You Gotta Eat Here!” until I get a chance to snap my own. ]

Following the same theme as the last post about watching “YGEH!” and foods features in some of their segments, here is my version of their Korean Beef & Noodles that I made for the husband and myself the other night. I forgot the sugar, and it was sorely missed. The sauce is too acidic without it for my liking. Though, having said that, I’m not a fan of sugar in savoury sauces, so I will probably scale the sugar back to 1 – 2 tablespoons when I make this again. And I will make this again. It’s fast, it’s cheap and it’s easy. This is exactly the kind of dish I love to make after a long day at work, and dinner needs to hit the table in under 40 minutes. (I let meat rest for 30 mins to come up to room temperature before I cook it.)

I think the meat cost me $2.50, the noodles were $1.25 a pack, and the rest of the ingredients added up to, maybe, $2.00? Again, dirt cheap to make. And fast. And packed with flavour. Feel free to add more vegetables if you like to bulk this dish out. I know that’s what I’m planning to do.

Korean Beef & Noodles:
Sauce
1 TBSP Garlic, minced
1/2 T Ginger, fresh (I used 1/4 T ground)
1/4 C Brown Sugar (I’ll use 1-2 TBSP max)
1/4 C Soy Sauce
3-4 TBSP Sesame Oil
1/4 T Red Chili Flakes

2 TBSP Oil (any nut based oil will work fine)
1/2 C Beef, cut into strips
1 Portabello Mushroom, sliced
1 Carrot, grated
2 Green Onions, rough chopped
S & P
1 Pkg Udon Noodles
Sesame Seeds

1. Mince the garlic and chop or grate the ginger. Place in a large bowl. Over that, pour the sugar, soy sauce, sesame oil and red pepper flakes. Whisk up and set aside.

2. Heat up a pan, and then add the nut based oil to it. When the oil is hot enough, drop in the beef and Portobello slices, and ladle about 1 cup of the sauce over top. Toss and stir to coat the sauce over everything in the pan, and then let everything cook long enough to brown the meat and slightly soften the mushroom. (About 3 minutes.)

3. Add the uncooked udon noodles to the pan, along with the salt + pepper. Stir to coat the noodles before grating the carrot over the pan and adding the rest of the sauce. Cook this all together over med-high heat for another 3 minutes or so (the noodles don’t take long to heat through, so take care not to burn the sticky sauce by leaving them in the pan too long).

4. Plate the mixture into serving dishes, and top each serving with the green onions and sprinkles of sesame seeds.

Lobster Mac & Cheese

LobsterMac&Cheese-3[ Click to embiggen picture of Lobster Mac & Cheese ]

We’re not the kind of people who love to go out to eat much anymore, nor are we the kind that dress up to go out for wine and fine food. Having said that, we are the kind of people who will watch tv shows like “You Gotta Eat Here!” and find new things to cook at home using ingredients neither of us have ever tasted or used, including some more pricey items like good cheeses or truffles. From time to time, mind you. We aren’t the Rockefellers. 🙂

I have been clearing out a backlog of food shows lately and came across one featuring lobster mac & cheese. My husband always stops wherever he is, whatever he’s doing, when his two favourite foods in the whole world are mentioned: lobster, and mac & cheese. So, of course I had to watch the “YGEH!” DĂ©ja-Bu segment over and over till I figured out how to make our own version at home, at our own stove, with the ingredients I know I could get my hands on easily. I even studied the recipe published on the tv show’s website.

I scaled down the increments from the originating recipe because I don’t like lobster (that was strictly for the husband), and it’s just the two of us feasting. Two bowls were more than enough for one night. I stored the rest of my Mornay sauce in the fridge to make another bigger batch of baked mac & cheese tomorrow or Monday night. Probably with some chicken and vegetables thrown into it for good measure instead of the lobster.

LobsterMac&Cheese-4

[ The basic Mac & Cheese using just the Mornay sauce, onions and cilantro. ]

Here’s what I came up with. Play along at home if you like this recipe.

Lobster Mac & Cheese:
(BĂ©chamel + cheese = Mornay Sauce)
1/4 C white or cooking onions, diced
2 oz butter
4 TBSP flour
1 lemongrass stalk (or three lemon rind peels)

3 C whole milk
S & P
2 oz gruyere + 1/8 C parmesan cheeses

2 C cooked pasta
1 TBSP butter
2 oz lobster meat (I used lobster flavoured white/pollack meat)
Drizzles of truffle oil (completely optional if feel you want the full Monty)

1. Start the pasta water so it boils while working on the other ingredients. Whack the lemongrass stalk along the length with the back of a big knife (or, if using a lemon instead, peel three strips of rind off) and set aside.

2. Melt the butter in a stock or sauce pan that can hold up to 5 cups of liquid easily. While that’s melting, dice up the onions. When the butter is bubbling, add the onion dice to the pot and let it cook for 3 minutes before adding the flour. Stir the mixture till it balls up and leaves the side of the pot to form the roux. Pour in 1 cup of milk at a time, whisking the roux into the liquid. Let the milk and roux heat through and thicken up, stirring occasionally so the milk doesn’t scald and burn at the bottom of the pan.

3. Add the pasta to the heavily salted pot when the water hits the boiling stage. Give the noodles a quick stir so they don’t stick or clump to each other as they cook for 8 minutes.

4. When the milk mixture is thickened enough to coat a spoon or spatula, remove the pot from the heat and start to ladle it into another bowl or pot with a mesh strainer sitting over the opening to catch the lemongrass or peels and the onions. Place this strained Bechamel back onto the burner and add the cheeses to the pot. When the cheese is fully melted, a few scoops of this Mornay sauce can then be used in a small to medium sauce pan along with two scoops of cooked pasta. Toss to coat the pasta fully.

5. Let the pasta and sauce simmer on med-low heat while melting butter in another small sauce pan. Add the lobster meat when the butter if fully melted. Toss to coat all of the meat; let it heat through (about 3 minutes).

6. Plate the pasta and sauce, and place the lobster meat over top of it, arranging the meat chunks in a pleasing arrangement on top of the noodles. Pour the butter drippings from the pan over top of the lobster, and sprinkle some rough chopped fresh herbs over that and top it all with drizzles of the truffle oil if using. Serve immediately.