A Batch of Cupcakes for Two

CupcakeFor2

[ Click picture to embiggen. Recipe & picture courtesy @AmberReed. ]

Sometimes I want something baked that’s a bit sweeter than a muffin, but I don’t want to make a full batch or a big production of it because half the time I want to taste test a new flavour combination I’ve thought up or found someone talking about online, and it just happens to be one the husband doesn’t like or isn’t into like Espresso Double Chocolate (for when I’m PMS’ing), so what is a girl supposed to do – park herself in front of a dozen muffins or cupcakes till they’re all disappeared from the house?

Uh, not going to happen!

I figure most of you feel the same way I do about not wanting a bunch of baked goods kicking around in the house, seductively calling out your name in the middle of the night from the kitchen all the way to your bedroom, like so:

“Psst! Hey, you! Oh good, you’re awake. Can’t sleep, eh? Me neither. Remember me? I’m those delicious treats you baked today. Come to the kitchen and visit. C’mon, just a short visit, and then I’ll have you back in bed in no time at all. I promise. I know you can hearrrrrrrr meeeeeee…” <– How many times has this happened to us, right?

Well, it doesn’t have to happen anymore. That’s right, the picture at the top of this post holds the perfect solution to our shared dilema, kids. Give it a go next time you’re craving.

(Don’t lie. We all crave. I know you’re shaking your head right now, but you’re also giggling because you know I know I’m busting you!)

Edit: The second set of increments in the picture are all missing their slashes to turn them into fractions. If you don’t correct your measurements, you’ll have a HUGE mess on your hands. Bake them at 350 degrees for 15-18 mins.

Breakfast Pasta Skillet

Pasta-Breakfast-Skillet

[ Breakfast Pasta Skillet recipe and picture courtesy of A Beautiful Bite ]

I feel it’s never too early in the day for pasta, so I like to find ways to make it for breakfast as well as lunch and dinner. And I never hear any objections from the spousal unit, so this is one I will be testing this long weekend.

I also want to test this with leftover Jasmine rice. Probably Asian noodles, too. And if we’re going that far, why not leftover bulgur?

‘Mmm… I making myself hungry running down the possibilities. Heh.

To The Birthday Girl

EllenBirthdayFinger

Welcome to the 44 club, Miss Ellen! I’ve been waiting for you. 😀

Now listen, before you get all huffy and upset about your age, check out these fantastic club members. How can you feel bad when you’re in this kind of company?! You can’t!

What are your big plans for your birthday?

I’m jealous that you get a long weekend to celebrate it with!!!
(Winter birthdays without long weekends are cruel!)

I would bake a dozen cream puffs with chocolate sauce for you if you were here, or I was there. I wish I was there. Or you were here.

{sad face}

Tell me everything. I want all the details. Don’t leave anything out!

Cabbage Roll Soup

CabbageRollSoup

I made a huge batch of Suze Muse’s cabbage rolls the other day. Susan’s recipe yielded so much filling, feel like I could have made five to eight more rolls if I had only bought two, not one, head of cabbage. Oh, well. I stuffed the leftovers in the fridge making a mental note to find something clever to do with them.

The next day I was playing around on my Pinterest cabbage board when I found what I was looking for in the form of soup. I don’t get to make or eat soup at home much anymore since someone doesn’t like hot liquids, and since I do all of the cooking, that means I predominately make stuff we can both enjoy. Not soup. Soup is made, maybe, twice a year around here? It’s tragic. Really, it is. I miss my soups.

Since I had all of the meat mixture and the cut up cabbage on hand, all I needed was a damn good broth. But… I didn’t really like any the broth ideas I found so I realized I’d have to make my own. It’s not hard to make a great soup broth as long as you have an idea of what final taste you’re after. In my case, I was after a somewhat spicy, slightly tomato-y base but without actual tomato chunks, and I wanted it to be clear, not creamy. So this is what I came up with:

3-4 C water (bring to a boil)
1 chicken bouillon cube (add to water from the start)
1 carrot, peeled, cut into quarters lengthwise, and then diced up
1 celery, peeled, cut into quarters lengthwise, and then diced up
1 1/2 C cabbage, chopped into small ribbon chunks
1 1/2 C leftover cabbage roll filling (meat and rice, with their seasonings)
5 dashes Worcestershire sauce
1 Tbsp tomato paste
1 Tsp dried oregano
S&P, to taste

Bring the water and bouillon cube to a boil, then add your chopped up carrot and celery.

Cook this over medium-high heat for five minutes before adding the leftover cabbage roll filling, chopped cabbage leaves along with the Worcestershire sauce and tomato paste.

Stew all of this in the pot for another ten minutes before adding your seasonings to finish it all off with another three to five minutes of cook time.

Serve with a dollop of sour cream on the side if desired.

Feel free to change this up to your liking as you make this recipe over the years. If I had thought about this properly, I may have added a Bay leaf or two to the pot at the top also.

Yields about 4 servings.

Homemade Roasted Peppers

peppers2
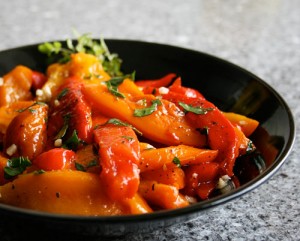
[ Roasted Peppers – image from Google Images ]

Bet you didn’t know how easy it is to roast your own peppers at home. It is. And I do this often. I love roasted peppers. They are the perfect burger and sandwich topper in my books. I eat them all year long. Over chicken, over beef, over pork, over turkey — there is nothing that can’t be improved by being topped with roasted peppers. Nothing.

This is my method for roasted peppers done bare bones style, but certainly you can store the finished roasted peppers in a jar with some mild homemade oil-based brine if you like. I wouldn’t fill the jar with the brine until after all the peppers have been placed inside it. And even then, I wouldn’t fill the jar more than a third of the way with the brine because, as the roasted peppers rest in the fridge, they will release liquid from the cooked meal. That typically fills the jar up about half way.

Okay, here’s how I do my roasted peppers:

First turn your oven on to its broiler setting, then wash, dry and cut up the peppers into manageable sections so the peeling stage isn’t a huge mess and risky (since I’m klutzy and have a habit of dropping everything I come into contact with).

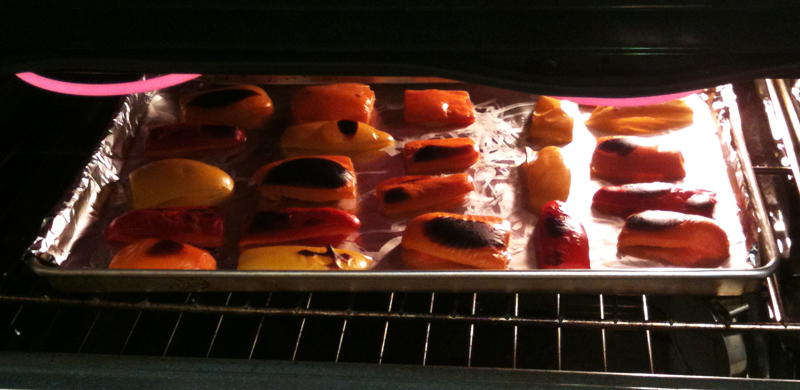
From there, I place the peppers flesh down on a lined baking sheet. I use parchment paper, but when I run out, I use tin foil and it works just as well. You’ll want something on the baking pan because the charring goo tends to burn and stick to your pans, and trust me – no one has time for that kind of cleaning nightmare!

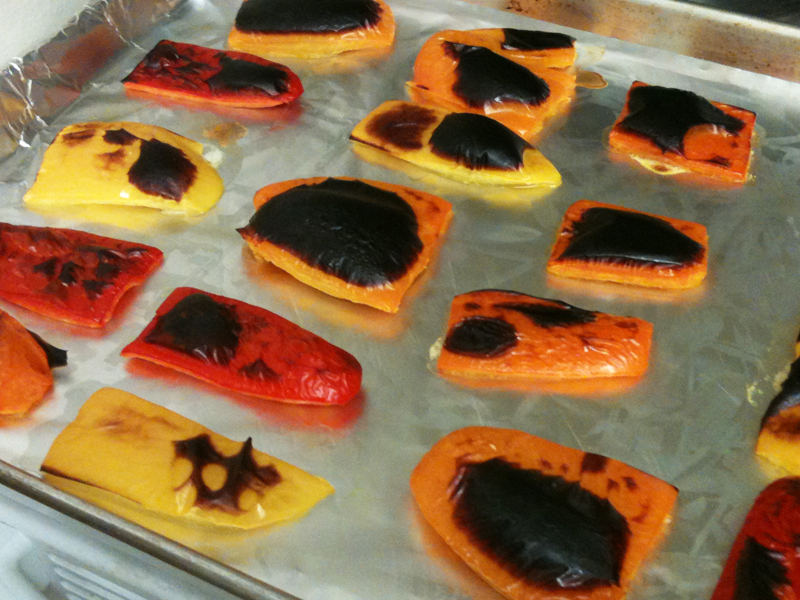
When you have all the peppers on your lined baking pan, place it on the middle rack and leave the door ajar about 1-2 inches. Set your oven timer for 15 minutes and wait. And try not to panic when you see the skins turning black. All of them. All over. This is what you’re after. It’s totally normal, and ok.

RoastedPeppers-Broiling[ Click to embiggen ]

RoastedPeppers-Blackened[ Click to embiggen ]

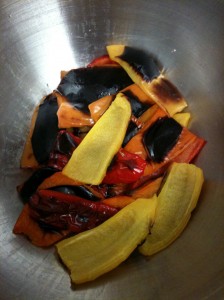
After they’re done broiling, take the baking pan out and immediately move the peppers to a waiting bowl or dish you can cover with plastic wrap. Cover the bowl and let the heat sweat the skin off of the meal for 5-10 minutes. When you can hold them in your hand without needing burn cream, you’re ready to get down to business. 🙂

After 15 minutes, grab a small bowl and pull back the plastic wrap, and prepare to get your hands dirty. And wet, and sorta icky. The fun’s about to get started, kids! 😀

RoastedPeppers-Sweating[ Click to embiggen ]

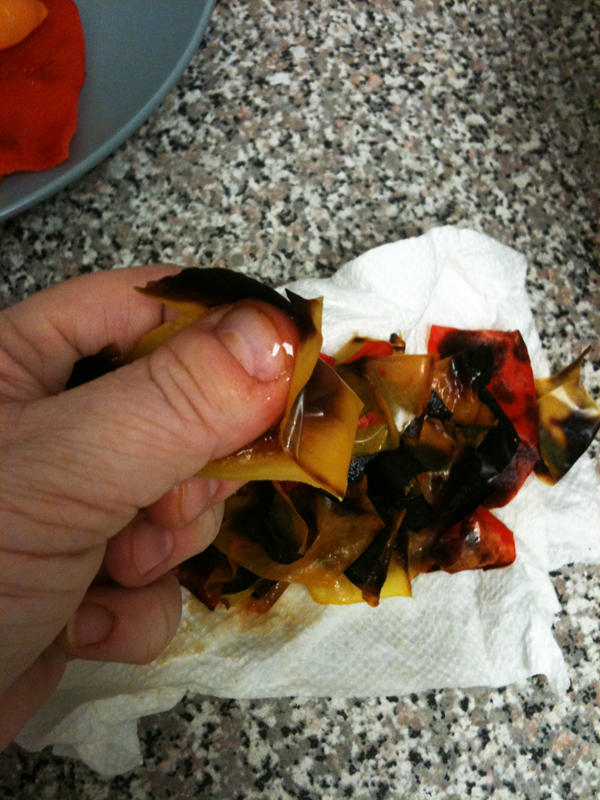
Holding a section at a time in your hands, start pushing the skin away from the flesh. You should be able to do this with complete ease. If you get a few peppers with some attached skin, put those peppers back on the baking pan and roast them another 5 minutes before sweating them again for five minutes. Don’t panic, this happens to me once in awhile, too. It’s no big deal.

RoastedPeppers-Peeling[ Click to embiggen ]

You should be able to get your thumb or finger under the skin and push, pull or pinch the skin away from the pepper meal when the roasting is completed. Discard the skin into the small bowl before green binning it during your clean up.

When the whole lot has been skinned completely, carefully place them into a glass jar with a tight fitting or sealing lid. Let the full jar rest 10 minutes on your counter until you can hold the jar without it feeling too hot to handle. At that point, you can put it into your fridge to stop the continued cooking process. Ideally you’ll want to place this on a shelf away from any dairy that can curdle for the first 12 hours. After that, I tend to store mine in the fridge door because they never last long enough to spoil anyway.

Pick the peppers out of the jar with tongs or a fork to enjoy without the juice. If the peppers are too wet for your liking, dab them with a paper towel before consuming them. When serving the roasted peppers to a crowd, strain the whole jar into a bowl with a small mesh strainer in it to catch the peppers. Reserve the juices in the jar for the leftovers, if there any.

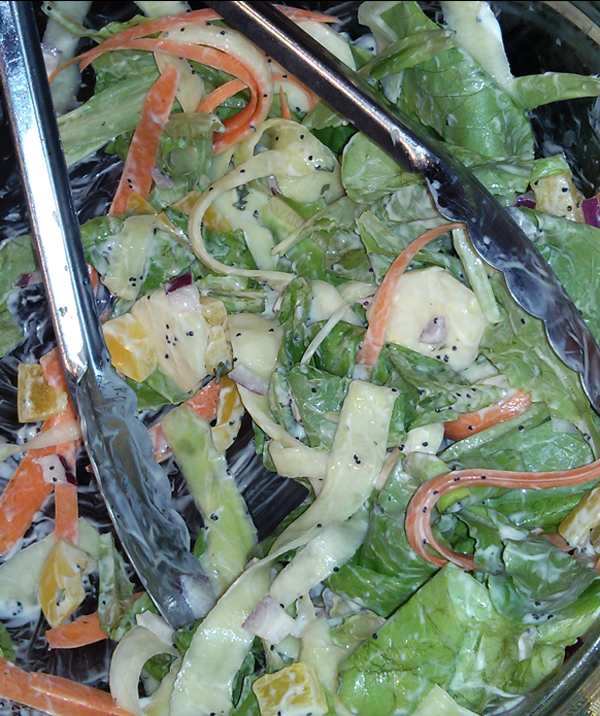
Enjoy liberally as part of your next antipasto plate, or on top of meat, in and on top of a veggy dip, as part of a rice skillet, or in a deli or panini sandwich!

Orange Julius Tweak

OrangeJuliusRedone

So, the other day I blogged about Mel’s lovely Classic Orange Julius, and mentioned in that post that my friend Lisa wondered on Facebook whether she could make this without adding sugar. I said I would play with it and see what’s what.

I am happy to say that taking the sugar and the vanilla out and adding in vanilla flavoured Greek yogurt did the trick. And it also killed a few birds with one stone. It not only pared down the number of ingredients to use, but it also added a great creaminess to the drink that my husband said was missing for him (and I agreed) – all done without any flavour loss or sacrifice!

Here is my version that makes enough to fill two 16 oz tumblers:

Auntie Stacey’s Orange Julius:
1 C Milk
1 C Water
2 Tbsp Vanilla Greek yogurt
4-6 oz Orange Juice concentrate
4-6 Ice Cubes

My Summer Salad & Dressing Love Affair

summersalad

This is going to be my new Summer salad dressing jam this year. It’s a riff on a poppy seed dressing I found online. I added, subtracted, and of course, divided to get to this perfect equation of creamy goodness, and I’m sharing it with all of you.

Creamy Summertime Poppy Seed Dressing:
1/4 C Mayo
1/4 C Sour Cream
1/4 Tsp Sugar
1/4 Tsp Lemon Juice
1 Tbsp Vinegar
1 Tbsp Poppy Seeds
Dashes of Salt & Pepper

Combine all of the ingredients in a mason jar with a tight fitting lid so you can shake it up, or in a small bowl using a whisk. It will yield enough for 4-6 salad servings.

Enjoy this over the following salad I put together tonight. It was so tasty, I couldn’t stop eating it even after I finished everything on my plate and my stomach screamed, “I’m full. You can stop now!!”

Summertime Salad:
1/4 Sm Red Onion (finely diced; tempered in a bowl of water for 15 mins)
1 Med Zucchini, peeled into ribbons (until you see seeds; then dice core into medallions)
Sea Salt
1/4 Yellow Pepper (rough cuts are fine)
1 Med Carrot, peeled into ribbons
6 C Loose Leaf Lettuce (washed 4 times and dried off completely)

Fine dice the red onion and drop it all into a small bowl of water to temper for 15 minutes while you peel the fleshy portion of the zucchini into ribbons. Place the ribbons in a salad spinner basket sitting in its reservoir bowl and sprinkle sea salt all over them to draw out excess moisture; let this stand for 10 minutes. While waiting, dice the pepper and zucchini core, and then peel the carrot into ribbons.

Place the diced pepper, the zucchini medallions, the carrot ribbons and the loose leave lettuce in large salad bowl. When the 15 minutes are up, dump the onions over the zucchini ribbons and rinse them well under the tap. Run them through two passes in the salad spinner to get rid of all the water to avoid diluting the dressing in the final salad presentation.

Add the onions and the zucchini ribbons to the main bowl, top with all of it with the dressing, and toss to coat all of it well. Serve immediately. By the way, I served this salad with baked fish in case you were wondering.

Have fun stuffing your face. I know I did! 🙂

Cookie Crust – Attempt #1

CookieBase-3

The picture isn’t the best, but neither is the lightening in our dining room. Our track lighting was designed for mood and atmosphere, not food picture taking. My apologies.

I pressed 3oz of my Old Fashioned Oatmeal Cookie dough in each of the mini springform pans when making this butter tart torte and the accompanying yogurt cheese cake. I blind baked each crust for 8 minutes before cooling them down and then filling them up for the full bake.

I really liked this crust alternative. It turned out quite well and I’m happy with the results. The crust was crunchy enough to need my fork to pierce it, but not too crunchy to be hard to chew. It was the perfect kind of base for a yogurt cheese cake given the crust provided a lovely sweetness that complimented the unsweetened (for the most part) yogurt filling to this cake. This is going to be my new go-to crust for cheese cakes!

However, when it came to the butter tart, I found the crust’s sweetness compounded with the butter tart filling’s sweetness just made it overpowering. I’m not a fan of overly sweet desserts to start with, but after eating one piece, aloud I counted down to the onset of my first ever diabetic coma. And I don’t even have diabetes!!

Needless to say, I believe the husband’s family will love this butter tart tort with my cookie crust. It’s just the perfect amount of everything they love: butter to goo ratio, fruit to nuts ratio, and sweetness in the crust ratio. I think this will be hit with them because it isn’t with me. We tend to have differing tastes in desserts right across the board historically. 😉

Summer Drinks – Iced Coffees

TPW_icedCoffee

[ Photo by Ree Drummond, ThePioneerWoman.com ]

There are few things I love more in the wickedly hot Summer months than iced coffee. Sometimes I crave it during the winter, but that’s when I know my hormones are out of whack and I dutifully warn my husband about the rough week that’s ahead of him with me. I’m a considerate wife like that. {ahem}

I have done all the iced coffee brews out there that start with hot coffee and found them all too painstaking and warm, and for awhile I was even using the powdered Starbucks VIA packets (which I recommend if you’re stuck at work – just add cold water and ice if you can get it, and you’ll be good to go!), but I have never made time to try the cold brew methods so many have sworn by.

I’m dumb. Really dumb. And possibly pathologically stubborn. (Don’t ask my family or husband to verify this statement. Please.)

So, here are a few recipes for cold brewing coffee I have been trying out recently that, if you love iced coffee like me, you will want to check out, too. Seriously. Do yourself this favour. Don’t ignore this idea any further. This will complete your life. I swear on my father’s grave!

1. The Pioneer Woman‘s dead easy recipe for brewing a month’s worth of cold coffee. I love her recipes; she never lets me down. And my husband’s eyes light up like a Christmas tree anytime I mention her infamous “crack noodles.” Anyway, I just realized something. She blogged this coffee gold in 2011, and I’m just now getting around to it. Clearly I need life coaching.

I like that her recipe is for the straight brew because that gives me a lot of options for add-in ingredients. I’m experimental when it comes to my coffee drinks, given enough time to think about what I have on hand and how I want it to taste. I don’t always have the time, though. I’m thinking this would be a great weekend brew. Especially if I want to do a great Thai iced coffee drink (with the sweetened condensed and regular milks) idea Ree mentions at the end of her post.

2. Food 52 had posted a great cold coffee recipe that is very similar to Ree’s but it adds all of the sugar and ground cinnamon upfront, so it can stew overnight with the coffee grinds.

This was the first one I tried, and I have to say, it’s perfect. Nothing like pouring the already sweetened strained brew into a glass over ice and being able to drink it immediately. No fussing around with other ingredients because you’ve already added them the night before. This one is a no-brainer on those hot, sticky mornings where you just want to fill ‘er up, and rush out the door to work!

Food52

[ Photo from Food52.com ]

So, there you have it. Your two essential cold coffee brew ideas. Enjoy, and feel free to hit me in the comments with your own suggestions or recipes to add to this post. 🙂


Summer Drinks – Orange Julius


Orange-Julius-Pour-jpg

Mel, from MelsKitchenCafe.com, has been kind enough to blog about her homemade knock-off version of the mall drink my husband loves so much, the Classic Orange Julius. I said the other day on Facebook I would be testing this drink recipe in the days ahead to see if it needed any changes or if it was solid as a rock the way it is. I’m looking to make this drink lots over the coming hot days of summer, so the recipe has to be perfect.

And it is!

But, me being me, I made the executive decision to kill two birds with one stone and do away with the use of milk and vanilla extract by using Vanilla flavoured Earth’s Own Almond Milk (the only brand I will ever drink from now on because it’s so damn good and doesn’t spoil as fast as the other brands do).

As suspected, the almond milk blended beautifully and the flavour didn’t suffer one iota. In fact, it probably improved upon Mel’s recipe a smidgen. I hope she won’t mind my tweak.

The only other tweak I want to try out is for Lisa. It’s an idea I have for eliminating the sugar as she asked about on Facebook. I want to see if I can make this using the vanilla almond milk as well as vanilla Greek yogurt.

My reasons for using Greek yogurt is to thicken the drink up a bit, to see if it will blend a bit more towards a smoothie or milkshake type of drink. Sometimes I’m just in the mood for a milkshake, you know? And the extra hit of flavour from the second source of vanilla hopefully will make up for the omission of the powdered sugar. Well, in theory it will, right? We’ll shall see. {crosses fingers}

And naturally, I will report all of my findings back to all of you here on my blog. 🙂